*分享我的博客搭建经历
需求
1、阿里云服务器
2、本地电脑Node+git
3、finalshell
finalshell下载 阿里云盘:
1
| http://www.hostbuf.com/downloads/finalshell_install.exe
|
4、Typora编辑器
Typora下载 阿里云盘:
1
| https://www.aliyundrive.com/s/qNyXkb1enwk
|
1.安装nginx
安装ngin需要相关的依赖库,我们先进行库的安装。
1.1安装gcc gcc-c++
1
| yum install -y gcc gcc-c++
|
1.2安装PCRE库
1
2
3
4
5
6
7
8
9
10
11
12
13
| cd /usr/local/
wget http://downloads.sourceforge.net/project/pcre/pcre/8.37/pcre-8.37.tar.gz
tar -xvf pcre-8.37.tar.gz
cd pcre-8.37
./configure
make && make install
pcre-config --version
|
1.3安装 openssl 、zlib 、 gcc 依赖
1
| yum -y install make zlib zlib-devel gcc-c++ libtool openssl openssl-devel
|
1.4安装nginx
1
2
3
4
5
6
7
8
9
10
11
| cd /usr/local/
wget http://nginx.org/download/nginx-1.17.9.tar.gz
tar -xvf nginx-1.17.9.tar.gz
cd nginx-1.17.9
./configure
make && make install
|
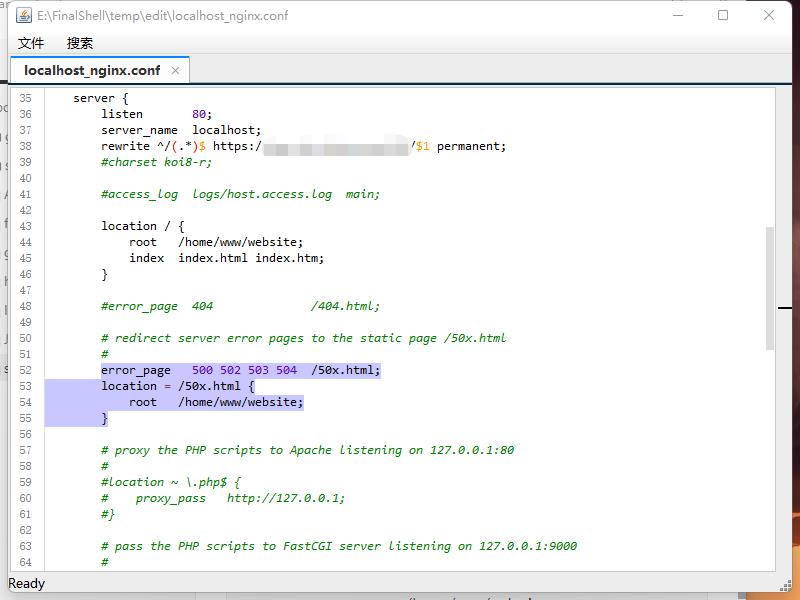
修改配置文件server 80 端口下的root项 为/home/www/website;
1
2
3
4
5
6
7
8
9
10
11
12
13
| cd /usr/local/nginx/conf
修改 nginx.conf root项为/home/www/website
location / {
root /home/www/website;
index index.html index.htm;
}
error_page 500 502 503 504 /50x.html;
location = /50x.html {
root /home/www/website;
}
|
如图修改
2.安装Git以及Node.js
2.1安装Node.js
1
2
3
4
5
6
7
| cd ..
##回到/usr/local目录下
curl -sL https://rpm.nodesource.com/setup_10.x | bash -
yum install -y nodejs
|
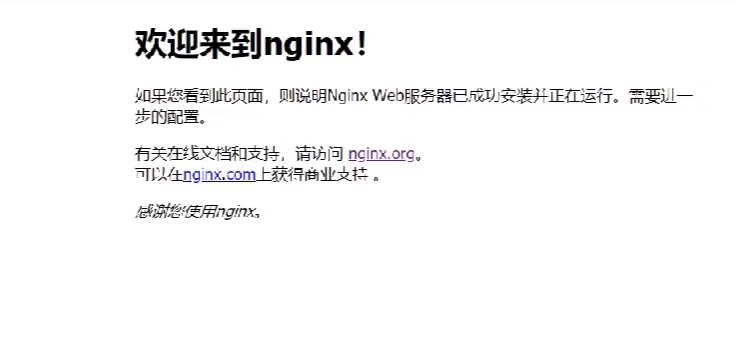
查看是否成功
启动
1
| /usr/local/nginx/sbin/nginx
|
启动成功
2.2安装Git及配置仓库
安装git及新建git用户
1
2
3
4
5
6
7
8
9
10
11
12
13
14
15
| yum install git
adduser git
chmod 740 /etc/sudoers
##vi 编辑文件
vi /etc/sudoers
添加 git ALL=(ALL) ALL
chomd 400 /etc/shdoers
sudo passwd git
|
*编辑完文件 保存退出> 键盘按esc键 后输入:wq
切换git用户
1
2
3
4
5
6
7
8
9
10
11
12
13
| su git
cd ~
mkdir .ssh
cd .ssh
vi authorized_keys
chmod 600 ~/.ssh/authorized_keys
chmod 700 ~/.ssh
|
创建git仓库
1
2
3
4
5
6
7
8
| cd ~
git init --bare blog.git
vi ~/blog.git/hooks/post-receive
##输入
git --work-tree=/home/www/website --git-dir=/home/git/blog.git checkout -f
|
保存退出
1
| chmod +x ~/blog.git/hooks/post-receive
|
**以上指令都需要在su git 之后执行 如果中途断开重新连接过,需要重新执行 su git指令 进入git账户。
新建/home/www/website文件夹
在root用户下执行,所限先su root切换为root账户
1
2
3
4
5
6
7
8
9
10
11
12
13
14
15
16
17
| su root
输入密码
cd /home
mkdir www
cd www
mkdir website
###修改文件夹权限 *重要
chmod 777 /home/www/website
chmod 777 /home/www
|
本地物理机
成功结果:
*修改本地配置文件
hexo源文件_config.yml 不是主题模板下的_config.yml
1
2
3
4
| deploy:
type: git
repo: git@你的ip主机地址:/home/git/blog.git
branch: master
|
写入启动脚本
在/etc/init.d/路径下添加脚本文件,名称为nginx,内容如下:
新建文件(不需要后缀)
1
2
3
4
5
6
7
8
9
10
11
12
13
14
15
16
17
18
19
20
21
22
23
24
25
26
27
28
29
30
31
32
33
| #!/bin/bash
#Startup script for the nginx Web Server
#chkconfig: 2345 85 15
nginx=/usr/local/nginx/sbin/nginx
conf=/usr/local/nginx/conf/nginx.conf
case $1 in
start)
echo -n "Starting Nginx"
$nginx -c $conf
echo " done."
;;
stop)
echo -n "Stopping Nginx"
killall -9 nginx
echo " done."
;;
test)
$nginx -t -c $conf
echo "Success."
;;
reload)
echo -n "Reloading Nginx"
ps auxww | grep nginx | grep master | awk '{print $2}' | xargs kill -HUP
echo " done."
;;
restart)
$nginx -s reload
echo "reload done."
;;
*)
echo "Usage: $0 {start|restart|reload|stop|test|show}"
;;
esac
|
然后执行
nginx指令
启动service nginx start,停止service nginx stop,重启service nginx reload